On one of my previous guide I have explained you guys how to install and setup whatsapp on pc by using an android emulator called youwave. That article seems very popular and read by more than 500 people daily on this blog.
However there is one constrain on that method. It is that youwave is a commercial software and the free version only lasts for 7 days as I explained there. But you could always uninstall and reinstall after 7 days to get it working for 7 days more.
But now there is this software called bluestacks app player. Which emulates android apps better than youwave and most of all its free.
1-Download and install bluestacks app player
2-Download ans install bluestacks app player from here .
It is a web installer so it requires internet to fetch the files and install.
3-Install whatsapp inside bluestacks
4-This process is very easy and self understandable. Navigate to “Social” tab inside the window and you will find whatsapp. click install button
Done
5-Next steps are the same which you would do to setup whatsapp on your mobile phone or tab.
6-Complete the verification by giving your mobile phone number which can receive an sms. And enter the number to activate whatsapp and enjoy
Adding contacts To Whatsapp....
No option to add contacts is a major problem which people face when using Bluestacks app player. Specially when running programs like whatsapp on bluestacks app player, you need to have a contacts list in order to chat with them. When using youwave to run whatsapp this is not a problem because its a general android emulator which includes all the default android functions like dialer and contacts. But Bluestacks app player is different than youwave and it doesn’t include contacts app by default.
A lot of people who read my guide about installing whatsapp on PC with bluestacks app player . Asked me about how to add contacts to app player to use those with whatsapp. On this guide I’m going to explain the most easy way to do this by using android app “Go contacts EX”
Open Bluestacks App Player and click “App Search”
Click the App search button and type in “Go Contacts EX” and hit install button.
Open up “Go Contacts EX” on bluestacks menu and start adding contacts
Its just easy You can add contacts of people who you need to whatsapp and hit the save button. Now when you go to whatsapp it will show the contacts, if not refresh the whatsapp contact list and it will appear on whatsapp contacts list.
Posted by
Unknown18:39
Sunday, 16 December 2012
Now that Apple have released OS X 10.8 Mountain Lion to the world, there are a lot of happy campers out there who are enjoying the latest and most advanced operating system from the Cupertino based company. The download and installation of Mountain Lion for Mac users couldn’t be any simpler with it being available as a digital download via the Mac App Store and it being installed with just a matter of a few clicks over the top of an existing 10.7 or 10.6.8 installation.
But what about those users who want to enjoy the benefits that this latest operating system brings and run the latest OS X on a Windows based PC? Once upon a time this process, known as a Hackintosh, was quite a lengthy process that threw up a few hurdles along the way. Those days are a thing of the past thanks to the UniBeast method of creating a bootable USB drive and thanks to a recent update this is now possible using OS X Mountain Lion. Read on for the step by step guide.
Requirements:
Access to a Mac to download OS X Mountain Lion from App Store and prepare UniBeast USB Drive.
A minimum of 8GB or larger USB flash drive.
A PC capable of running OS X Mountain Lion.
Step 1: First and foremost, this process requires that you own a copy of Mac OS X Mountain Lion (10.8) and a USB drive with a minimum capacity of 8GB. The operating system is available to download from the Mac App Store for $19.99. If you haven’t already, download OS X Mountain Lion using your registered Apple ID.
Step 2: Download the updated and current version of UniBeast that is available from the downloads section of the tonymacx86 website (free of charge registration required).
Step 3: After the relevant software has been downloaded, the initial step is to create a bootable USB drive containing OS X Mountain Lion. With the formatted USB plugged into an available USB port on your Mac, open up an instance of Finder and navigate to /Applications/Utilities/Disk Utilityand highlight the relevant USB drive in the left hand column of the interface.
Step 4: Select the Current drop down menu and choose the 1 Partition option.
Step 5: Select Options underneath Partition Layout menu and make sure the Master Boot Record option is checked. Click Ok.
Step 6: On the right hand side of the Disk Utility window there are options to name the USB Drive. You can choose a name now or it can be done later. Under the Format header, make sure Mac OS Extended (Journaled) is selected. Select Apply before selecting Partition.
Step 7: Run the UniBeast 1.5.1 application that was downloaded in step 2. If UniBeast is giving you an error message relating to Mountain Lion being missing, make sure the installation file downloaded from the Mac App Store is located in the /Applications folder.
Step 8: When UniBeast is running, skip through the first few screens before selecting the relevant USB drive on the Select a Destination screen. Choose Continue, then enter your system password for approval. UniBeast will then look for the Mountain Lion installer file in the /Applicationsfolder and install it to the USB drive.
Once the process has ran its course and completed, the partitioned USB drive will have a functional version of OS X Mountain Lion on it that can then be used on a PC to create an installation of Mountain Lion. The next few steps can be followed through to ensure everything is working without issue.
Step 9: Insert the USB drive into the PC that you want to turn into a Hackintosh and make sure that the machine is set to boot from USB through the BIOS.
Note:Steps 10 – 12 are only required for new installations. If you are updating from an existing installation of Mac OS X Snow Leopard or OS X Lion these steps can be skipped.
Step 10: After booting from the drive, you should now be in the OS X installer. Set the desired language, choose the Utilities option from the menu bar before selecting Disk Utility. Select the target hard drive for the installation of Mountain Lion on your PC and click the Partition tab.
Step 11: Once again, select the Current drop down, select1 Partition before selecting Options and choosing GUID Partition Table.
Step 12: Type in Macintosh HD as the name of the partition and once again set the Format to Mac OS Extended (Journaled).
Step 13: Click Apply then Partition before closing down the Disk Utility.
Step 14: Now simply install Mountain Lion on this hard drive.
When the process is completed, restart the machine. When the machine boots up, choose the new Mountain Lion option to make the drive bootable.
So there we have it, a fully functional Hackintosh PC running the latest Mac operating system. Last but not the least, you will need to install the drivers for your machine. This can be done using MultiBeast tool, which can again be found in the downloads section over at tonymacx86.
Apple will obviously tell you that the Mac machines they produce are designed to work harmoniously with the software and operating systems that they also develop, but running OS X on a Windows based PC can be an extremely pleasurable experience now that the installation process is relatively pain free.
Inputs from-Redmond pie
Posted by
Unknown23:24
Saturday, 15 December 2012
For many Mac users who occasionally need to run Windows applications, virtualization solutions likeParallels Desktop, VMware Fusion, and VirtualBox are often the best way to do so. You take a definite performance hit with virtualization programs, but for most people the ability to run the applications they need without rebooting is more than convenient enough to make up for such shortcomings.
There is one exception: gaming. 3D performance is either much-reduced by virtualization or (in the case of VirtualBox) completely non-existent, and given that most Macs don't have top-shelf graphics processors to begin with, there's simply no substitute for running Windows on bare metal, as they say.
This means using Boot Camp to install Windows on your Mac as you would to any PC, and that means relying on Apple's Windows drivers to get everything working properly. The issue is that Apple doesn't exactly prioritize Windows driver updates, and this is doubly true when a new version of Windows is concerned: Boot Camp support for Windows 7 trailed general availability by about three months, and the song remains the same for Windows 8.
But official support be damned, we say! We installed Windows 8 on our 2011 iMac and 2010 MacBook Air to see what happened, and we kept a log of our findings to help those of you who don't feel like waiting on Apple's drivers.
Setup process
Because we haven't talked about this in a while, let's take a gander at the Boot Camp installation process as it stands in Mountain Lion. Here's what you need:
A Mac that supports Mountain Lion and has at least 20GB of free disk space, though more is obviously preferable.
A valid Windows 8 or Windows 8 Pro license key. For the purposes of this article, we're going to assume you're working with the 64-bit version of Windows (and at this point, you probably should be anyway).
If you're using a Mac with an optical drive or a MacBook Air older than the 2011 model, you'll need a Windows 8 install DVD (and, for the older Airs, an external optical drive).
If you're using a 2011 or 2012 MacBook Air or any other Mac without an optical drive, you'll need either an external optical drive and a Windows 8 install DVD, or a 4GB or larger USB stick and a Windows 8 ISO file. More on this in a bit.
A FAT-formatted external drive or blank CD or DVD on which to store the Windows driver files.
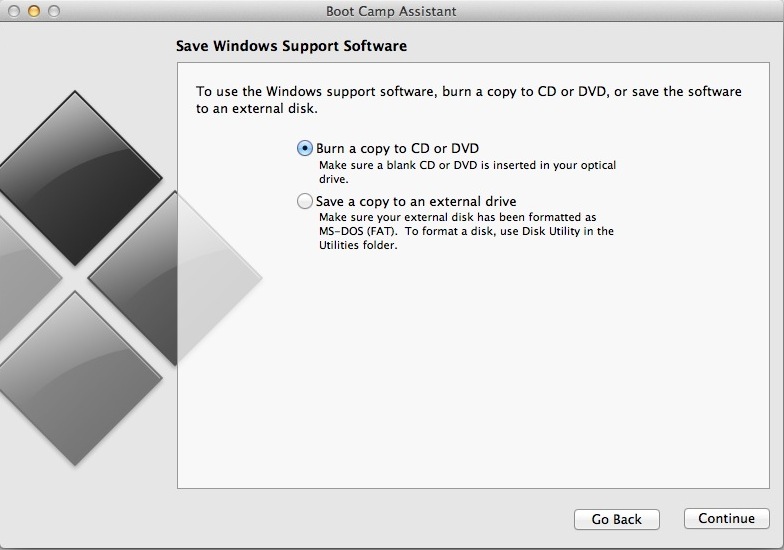
Once you've gathered the necessary materials, launch the Boot Camp Assistant from Spotlight or by navigating to Applications and then to Utilities. It will walk you through partitioning your drive to install Windows, downloading the necessary driver files to your external drive, and (for newer MacBook Airs, Retina MacBook Pros, iMacs, and Mac Minis without optical drives), creating a USB installer for Windows from an ISO file.
Enlarge / Downloading Windows drivers with the Boot Camp Assistant.
Users of slightly older Macs, however, will notice that the installer still requires a Windows install DVD before it will start working, and the option to create a USB drive isn't even available—those with access to an optical drive cannot opt to use any other method. Strangely, this requirement applies even to 2010, 2009, and 2008-era MacBook Airs, all of which shipped without optical drives; people with those computers will have to find an external optical drive before continuing.
After formatting your drive, let the Boot Camp Assistant reboot your computer, and install Windows to your newly created Boot Camp partition as you would to any PC. When going through the installer, be sure to reformat the Boot Camp partition to NTFS, but don't delete it—this will break the partition and require you to start over again from the beginning.
These days, the Windows installer is dead simple to get through as long as you're not terrified of technology—enter your product key and create a user account and you've done most of the heavy lifting. Once you reach the Start screen, insert the external drive containing the Windows support files, navigate to it from the desktop, and run setup.exe.
Installing the Boot Camp support software in Windows 8.
The Boot Camp installer shouldn't throw up any red flags—accept all of the setup defaults, and sit back and wait while it installs all of Apple's driver software along with Apple Software Update, and reboot when it prompts you to.
How does it work?
The vast majority of programs and drivers that work with Windows 7 also work with Windows 8. Luckily this also applies to much of Apple's Boot Camp software, including read-only access to your Mac's HFS-formatted partition, the Boot Camp control panel that lets you select your default boot partition and adjust other system settings, and the software that makes the Mac's function keys operate as they all do in OS X.
There are some small issues: the graphical overlays for things like volume and brightness don't show up in Windows 8, though the buttons operate normally, and things that bother me about Boot Camp in Windows 7 (like the inability to access FileVault-encrypted volumes) persist in Windows 8, but the new operating system doesn't bring any major, system-breaking new problems.
Do you find these overlays helpful? Well, they're not working in Windows 8.
Driver issues
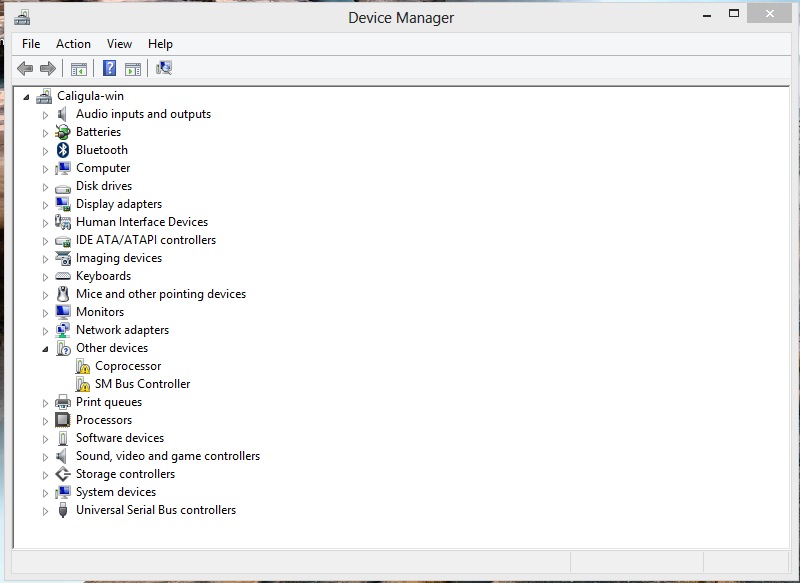
The biggest issues, especially for gamers, are the drivers. Depending on the Mac you have, you may need to track down and install some additional drivers yourself—2009 and 2010-era Macs with NVIDIA chipsets will probably need to download a separate chipset driver, available here (most Macs use vanilla Intel chipsets, though, so it shouldn't be an issue for anyone else).
Enlarge / My MacBook Air's NVIDIA chipset was missing a couple of non-critical drivers, but it's easy enough to fix.
The bigger problem is simply outdated drivers, particularly graphics drivers. The Boot Camp 4.0 software came out with Lion in summer of 2011 and hasn't really been updated since then, and as a result you may find yourself using drivers missing almost two years of fixes and performance enhancements.
Ancient drivers ahoy!
Luckily, new drivers are just a few clicks away—Macs use standard PC graphics chips, and these can be powered with standard PC drivers. Below, I've laid out a table of Macs, the graphics chips they use, the driver you'll want to download to go with them, and any other applicable information you'll need to know. All of the drivers below are for use with the 64-bit versions of Windows 8 (but even if you're still sticking with Windows 7, these drivers should help you out, too).
MACS
MacBook Air (2011, 2012), 13-inch MacBook Pro (2011, 2012), 13-inch Retina MacBook Pro (2012), Mac Mini (some 2011, 2012)
MacBook Air (Late 2008, 2009, 2010), 13-inch MacBook (2009, 2010), 13-inch MacBook Pro and aluminum MacBook (Late 2008, 2009, 2010), 15-inch MacBook Pro (2007, 2008, 2009, 2010, 2012) 15-inch Retina MacBook Pro (2012), 17-inch MacBook Pro (2007, 2008, 2009, 2010), Mac Mini (2009, 2010), iMac (Early 2009, some late 2009, 2012)
15-inch MacBook Pro (2011), 17-inch MacBook Pro (2011), Mac Mini (some 2011), iMac (some 2010, 2011), Mac Pro (2010, 2012)
None. Intel's drivers aren't flashy but they're typically reliable.
Your experience with this driver may vary. If you encounter crashes, try rolling back to an older version; my 2010 MacBook Air seems happiest with the 295.73 driver from February, 2012. Also note that, yes, iMacs and Mac Minis do tend to use laptop-class GPUs.
If for whatever reason the 12.10 driver won't install (it seemed not to like my 2011 iMac), try the 12.8 version here. Older 2000, 3000, and 4000-series GPUs (most often found in 2007, 2008, and some 2009 and 2010-era iMacs) don't have official Windows 8 driver support; you can try the latest Windows 7 driver from here, or content yourself with the performance of the Boot Camp driver, which will probably be fine for these older GPUs.
These cards were only available as an upgrade option for 2008 Mac Pros, or if you've installed an upgraded graphics card in your Mac Pro at some point.
This list should be fairly comprehensive as it stands, but note that we can't possibly test all of the GPUs listed with the suggested drivers, and one person's rock-solid driver could be a buggy, crashing mess for someone else. If you've encountered particular issues with a driver and GPU combo, bring it up in the comments and see if someone can get you the answers you're looking for. With a bit of luck you'll be able to find a relatively current driver that brings your graphics performance up to its best possible level.
Retina support
One final footnote before we finish up here: how does Windows 8 handle the Retina Display currently shipping in some MacBook Pros? When we installed Windows 7 on a 15-inch Retina MacBook Pro, our experience with 200 percent scaling was hit-or-miss, but Windows 8 is supposed to improve Windows' scaling for use with screens of many different pixel densities.
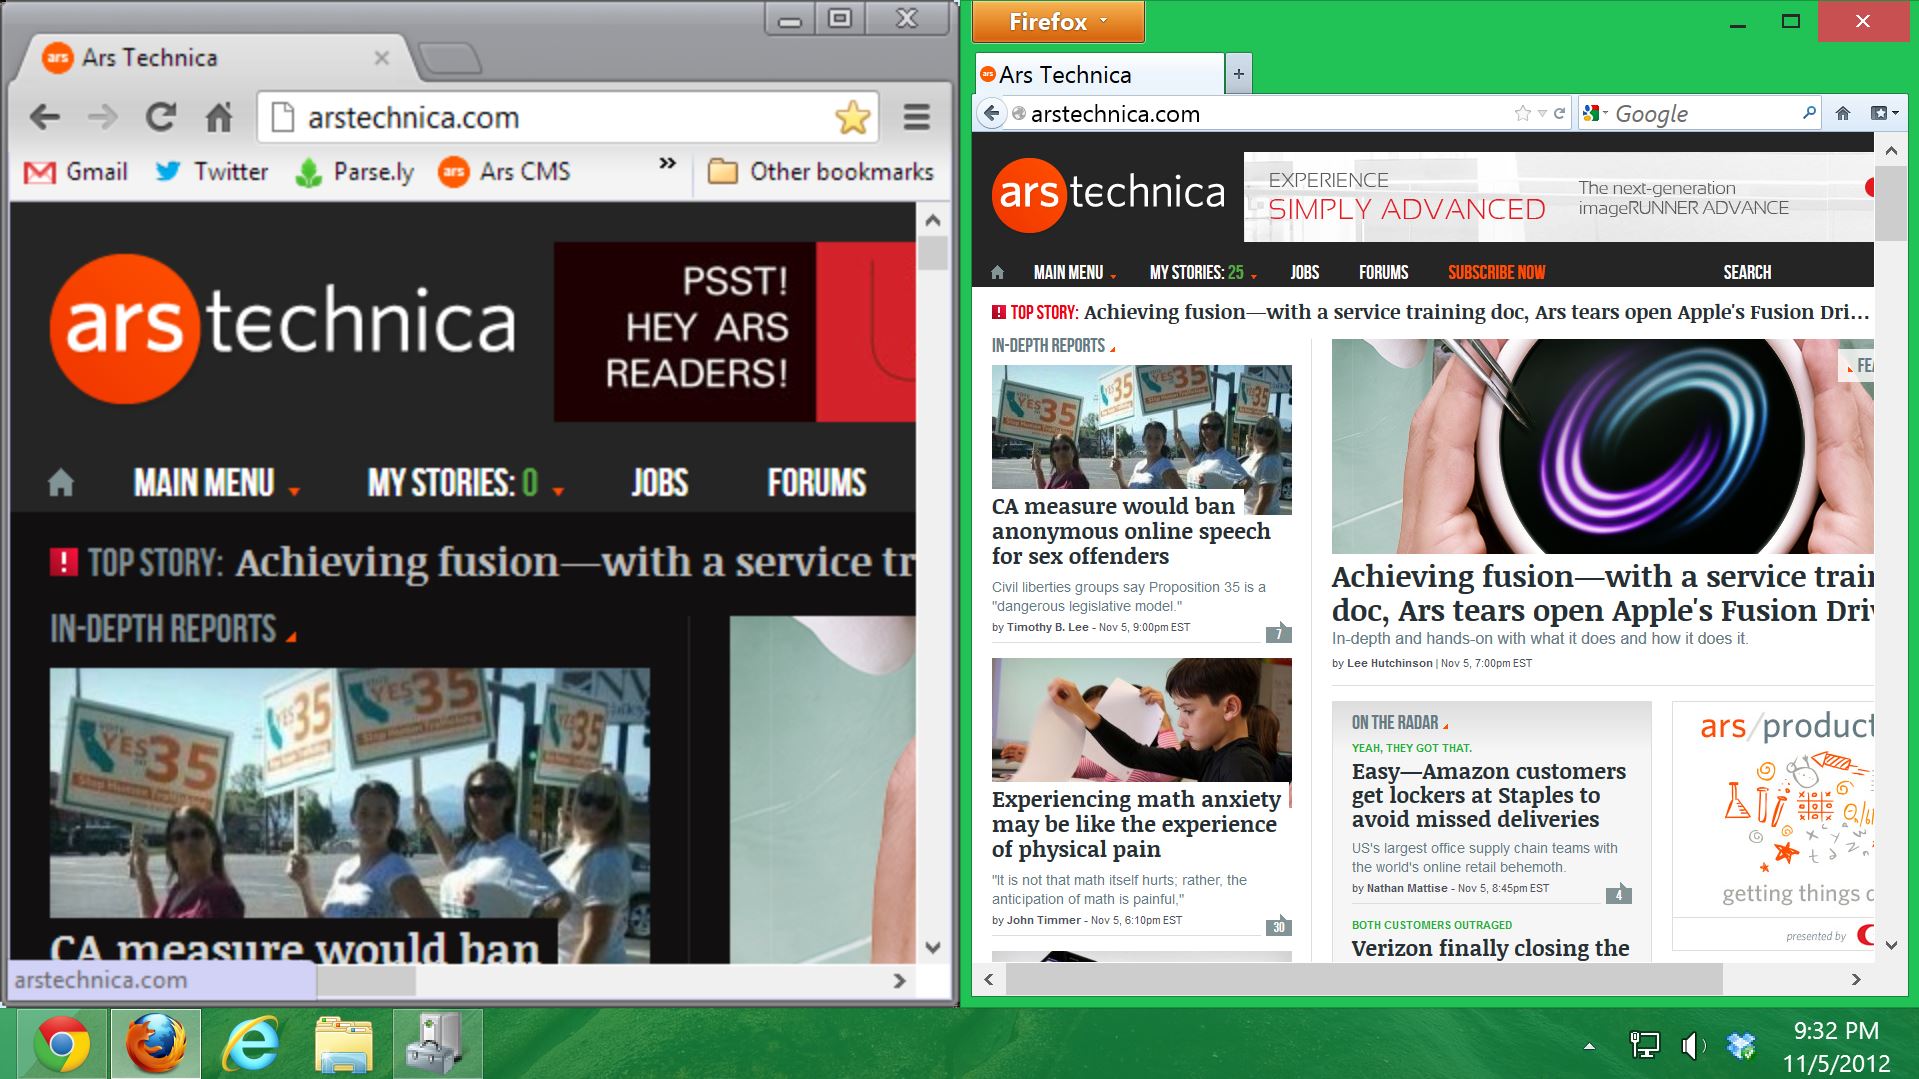
On the desktop, things haven't changed that much. Many of the same issues we had in Windows 7 persist: some icons and text looks great, other graphics (including the mouse pointer) look pretty bad. The biggest issue is still with consistency—different applications have vastly different behaviors, and while some applications look just great, others are blurry messes (or, worse, choose to ignore the scaling settings altogether).
Enlarge / At 200 percent, desktop scaling in Windows 8 is still a bit of a mess. Some apps, like Chrome (left) are scaled up but they're blurry messes, and others like Firefox (right) scale up their UI elements but don't scale up the window content.
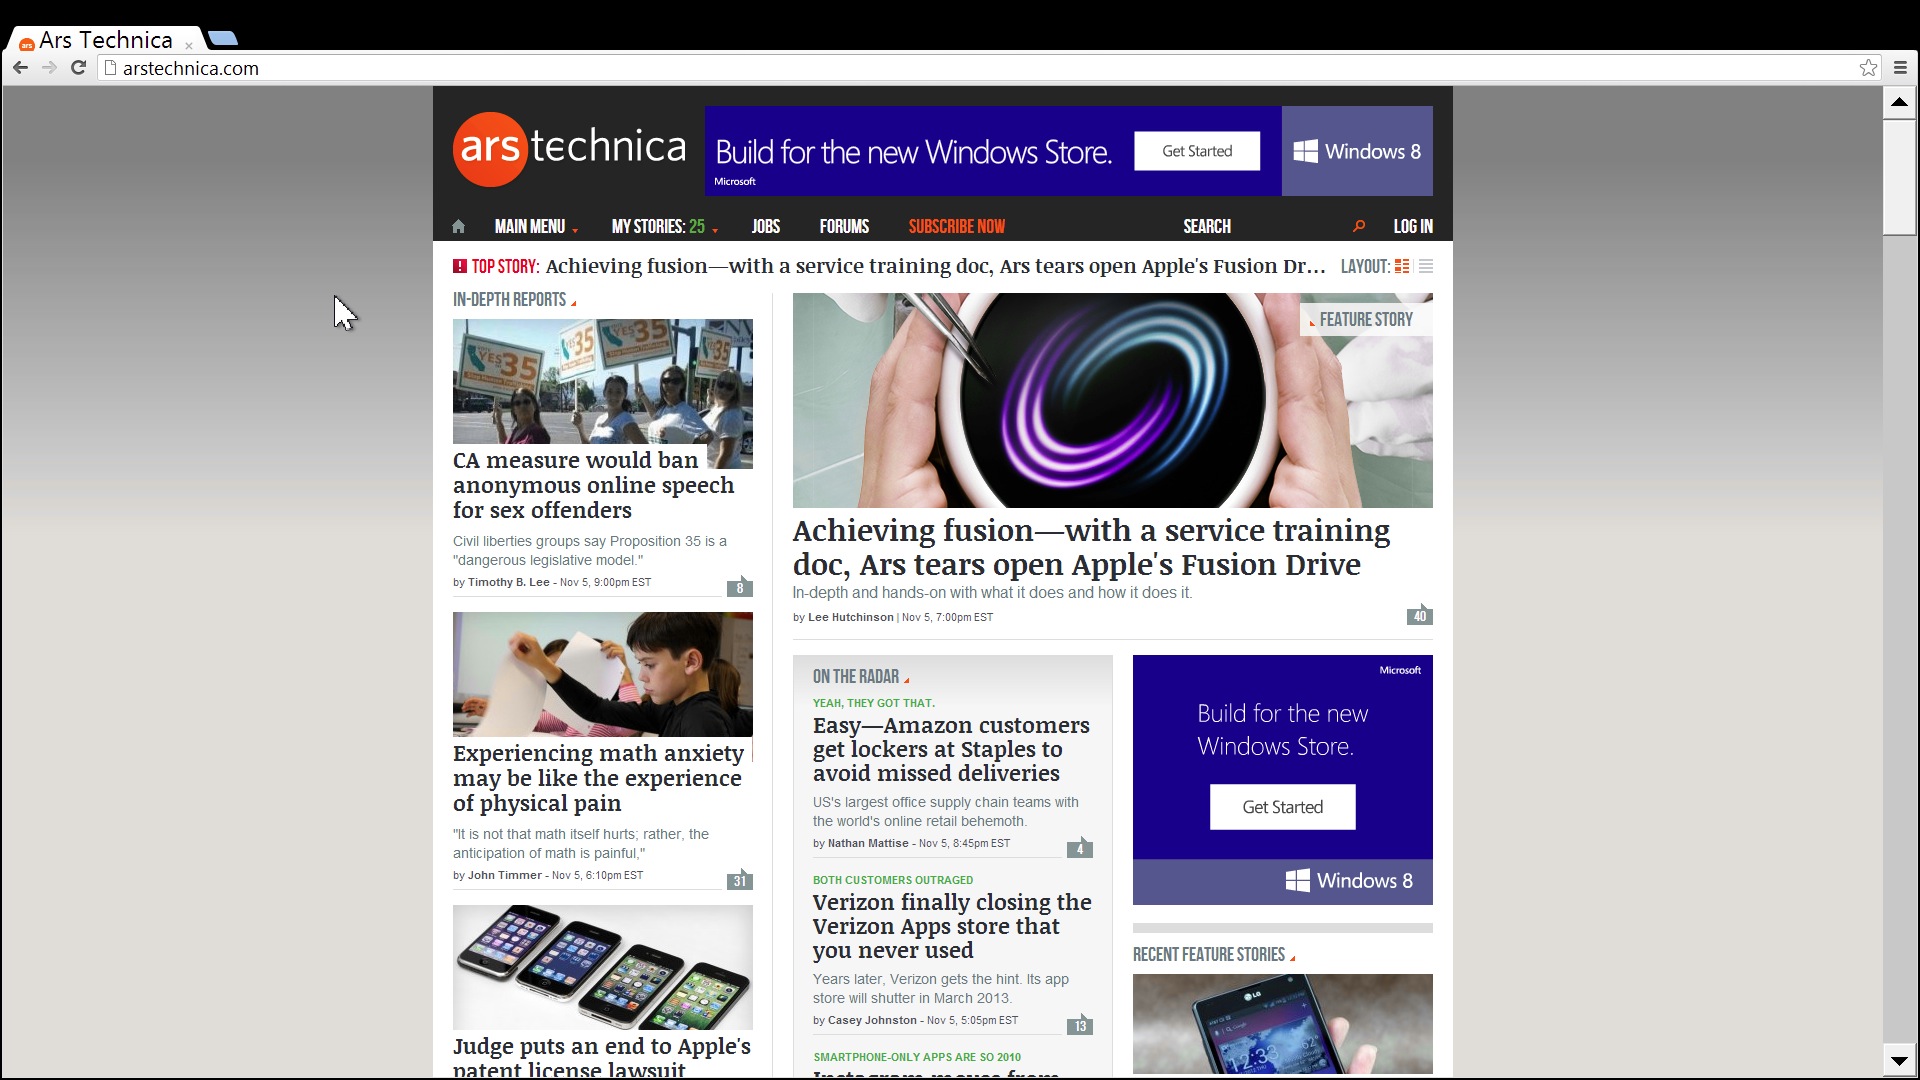
The behavior is slightly better for Metro apps. Every one of those I used, from the built-in Mail and Calendar apps to the New York Times and Kindle apps, looked just fine scaled up, though that doesn't mean every app you use will be that way—the Metro version of Chrome, for example, gave me a scaled-up scroll bar but chose to render pages at the same scaling level as before.
Scaling for the Start screen is handled separately from desktop scaling, so you need to go into Ease of Access the settings and toggle the "make everything on your screen bigger" switch.
Enlarge / Most Metro apps behave well when scaled up, though others (like Chrome here) continue to have consistency issues. Note the blown up scroll bar and unscaled window content.
Conclusions: Who needs official support?
The variety of Mac configurations out there make this sort of thing an inexact science, but in our experience you shouldn't have problems running Windows 8 on your Macs if you really want to. Official support will smooth over some of the rough edges in the experience, including lack of function key overlays and old, old graphics drivers, but Windows 8's compatibility with software and drivers made for Windows 7 should serve Mac users well here.
Tangentially related to this, can anybody point to any comparisons of native Mac games (WoW, Diablo II, Starcraft II, Steam games,etc) run in OSX vs Windows on the same Apple hardware?
I know there used to be an improvement in gaming performance using Windows... is that still true?
Yes.
jbourne08 wrote:
On Macbook 2008 ..windows 8 keeps freezing, had to restart my mac every time i used it.
This is the "dynamic tick" issue. Install the latest updates through Windows Update to fix itor disable dynamic ticking.
Run Command Prompt as Administrator and type this:
Code:
bcdedit /set disabledynamictick yes
and then reboot.
Dynamic ticks can be turned back in with
Code:
bcdedit /set disabledynamictick no
and then reboot.
with inputs from arstechnica.com
Posted by
Unknown19:02
Monday, 26 November 2012
THE POPULAR INSTANT MESSAGING SERVICE WHATSAPP CURRENTLY AVILABLE ON MOST THE PLATFORMS BUT SADLY NOT ON THE IPOD AND THE IPAD
I WILL SHOW U HOW TO ADD WHATSAPP ON THIS DEVICES,,PLEASE PROCEED AT YOUR OWN RISK IF ANYTHING GOES WRONG I AM NOT RESPONSIBLE.I AM AGAINST JAILBREAKING PLS BEAR THIS IN YOUR MIND
WhatsApp might simply not show up on the App Store on any iOS device other than the iPhone, and even when a user manages to install it, the app will simply display an error message when launched. If you’re not sure where to start, fear not, just follow our step-by-step guide.
Note: We only tested out this method on the iPod touch 4G, therefore we can’t say for sure whether it would work on other generation iPod touches or not.
1- Installing WhatsApp
Before the tweak can be applied, you must have WhatsApp installed first and your iPod touchshould be jailbroken. Since WhatsApp doesn’t show up on the iPod touch’s App Store nor can it be installed through iTunes, we must install it manually. Thankfully, there’s an easy way to do it. If you have WhatsApp already installed, feel free to skip over to the "Get WhatsApp To Work" section.
Step 2: From iTunes, search for "WhatsApp Messenger"and download it (alternatively, just get it from here).
Step 3: Launch iPhone Configuration Utility, which you should have installed earlier. From the hand-hand side, select your iPod touch and navigate over to the "Applications" tab.
Step 4: Click on "Add IPA" and navigate select the WhatsApp file you downloaded earlier, which should be placed under iTunes Media > Mobile Applications. Alternatively, you can drag the WhatsApp file from iTunes to your desktop, then point iPhone Configuration Utility there.
Step 5: Once the right IPA is selected, simply scroll down and hit "Install". In a matter of seconds, WhatsApp should be installed on your iPod touch.
2- Get WhatsApp To Work
Now simply launch Cydia from your iPod touch and look up "WhatsPad". Install the first result, which should be from the BigBoss repository and its free. Simply reboot your iPod touch after the install.
You’re done! You can now launch WhatsApp, which will work the way it works on the iPhone except that you’ll need a Wi-Fi connection all the time. Remember you’ll need to enter a 3-digit activation PIN, therefore keep in mind that since it’s a one time process, so you would need a cellphone with text message receiving capabilities. Just input the phone number in WhatsApp on your iPod touch, and the 3-digit PIN will be sent to you.









 Posts
Posts


EDITOR'S PICK: PROMOTED READER COMMENT
I know there used to be an improvement in gaming performance using Windows... is that still true?
Yes.
This is the "dynamic tick" issue. Install the latest updates through Windows Update to fix itor disable dynamic ticking.
Run Command Prompt as Administrator and type this:
and then reboot.
Dynamic ticks can be turned back in with
and then reboot.